Site Information

Welcome to Hertfordshire Walker

CPRE Hertfordshire double award winner 2022

Showing posts with label Rose & Crown - Essendon. Show all posts

Walk 115: Hertfordshire Marathon Loop

26 miles (41.8km) with 530m of total ascent


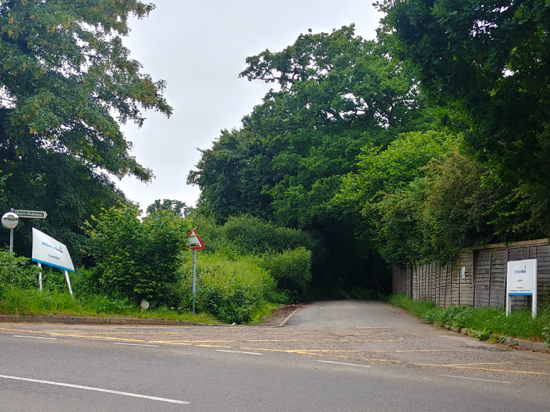
Rolling fields along part of the Hertfordshire Marathon Loop Image by Hertfordshire Walker released via Creative Commons BY-NC-SA 4.0
Rolling fields along part of the Hertfordshire Marathon Loop
We created this walk following a request from friends who asked us to create a 26-mile circular walk through the Hertfordshire countryside which they could use to raise funds for the National Autistic Society They wanted a marathon-length circular walk along footpaths, bridleways, byways and lanes. The Hertfordshire Marathon Loop is designed for anyone who wants to walk a marathon in aid of charity.

This walk can be started and finished at any point along the way, and we have routed it past both Brookmans Park and Welham Green stations for those wanting to reach the start point by train.

If you do the walk, please add comments in the box at the end of the directions and feel free to mention the charity you have supported by doing the walk.

We have added the names of pubs you will pass in case you need refreshments.

The walk is broken into 10 legs. To assist you we have added distances between points and the Hertfordshire right of way (ROW) names and numbers - although not all paths display the numbers. We have also added rough compass points.

Please make sure you have a back-up map and/or an Ordnance Survey app as well as a compass or compass app to help you with the route. There is a larger interactive map at the end of these directions with KML and GPX files that can be dowloaded to a compatible GPS walking app.

Directions


Note: This walk crosses over a golf course


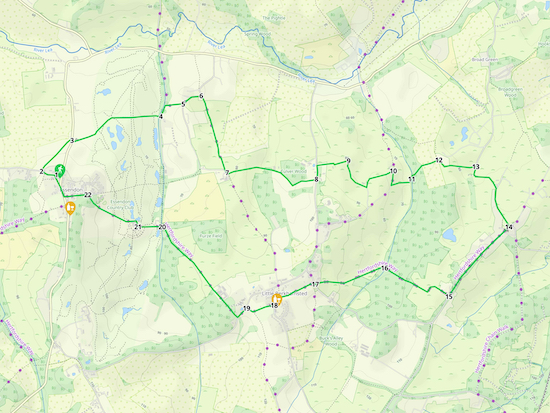
Map for Walk 115: Hertfordshire Marathon Loop Created on Map Hub by Hertfordshire Walker Elements © Thunderforest © OpenStreetMap contributors There is an interactive map below the directions
Map for Walk 115: Hertfordshire Marathon Loop
Created on Map Hub by Hertfordshire Walker
Elements © Thunderforest © OpenStreetMap contributors

There is an interactive map below the directions
Those with GPS devices can download GPX or KML files for this walk. We've added What3Words references for those who use that system. If you print these walks you might want to use the green PrintFriendly icon at the bottom of these directions to delete elements.

Leg 1: Brookmans Park to Grubbs Lane
2.5 miles (3.9 km)


1: From Brookmans Park (location - https://w3w.co/dame.jeeps.vital) head S on Bluebridge Road and take the second turn on the left, Bluebridge Avenue. Walk to the top of Bluebridge Avenue, go through a gate then turn right. Once through a gap in the hedge head E with woods on you left and the field on your right. Go through another gap, walk across Gobions Open Space passing the play area on your left. Continue E through the woods until you reach a track leading to Mymms Drive (location - https://w3w.co/shell.seats.puts).

2: Turn left on Mymms Drive, walk N, cross Georges Wood Road, then head N on Golf Club Road. At the golf club take the track on the right, North Mymms footpath 68, and pass Chancellor's School on your right. You will emerge at the top of Pine Grove. Turn left and head NNE along The Drive, still North Mymms footpath 68, to Bell Lane (location - https://w3w.co/noted.author.oath).

3: Turn right on Bell Lane then right again on the A1000, Great North Road, and head SSE for 100m looking out for a footpath on the left. Take this path, North Mymms footpath 37, and head ENE then NE past the Brookmans Park Transmitting Station, across a footbridge, and past a water tower on your right. Soon after the water tower look into the hedgerow on the right and see if you can spot the remains of a WWII spigot mortar emplacement. At this point the path becomes Hatfield footpath 86 and continues to Grubbs Lane (location - https://w3w.co/spent.next.thus).

Leg 2: Grubbs Lane to Epping Green
3.3 miles (5.3 km)


4: Turn right on Grubbs Lane and head E crossing Kentish Lane and continuing E along Hatfield bridleway 87. After 780m the bridleway goes through a farmyard. Continue heading E for 1.3km until you reach a junction. Here you turn right and soon after left on Hatfield bridleway 88. Continue heading ESE for 930m until you pass a farm on your right (location - https://w3w.co/steer.prefer.aside).

5: Immediately after the farm take the footpath on your left, Hatfield footpath 90, and follow it N first downhill then uphill until you reach Tylers Causeway. Turn left on Tylers Causeway and head W for 100m looking out for a footpath on your right (location - https://w3w.co/learn.royal.years). This is Hatfield footpath 91 which later becomes Little Berkhamsted footpath 13.

6: Take this path and follow it N then NE until you reach a junction with Little Berkhamsted bridleway 27. Turn right on this bridleway and follow it to Epping Green. Turn left on the road and head N for 50m looking out for a footpath on the right just before the Beehive pub (location - https://w3w.co/homes.rips.rooms).

Leg 3: Epping Green to Howe Green
2.2 miles (3.7 km)


7: Take this path, Little Berkhamsted footpath 14, and head NE across a couple of fields until you reach a gate leading to Little Berkhamsted bridleway 23. Turn left here and follow the bridleway NW and N through Bucks Alley Wood until you reach a footpath on your left (location - https://w3w.co/record.cafe.issued).

8: Take this path, Little Berkhamsted footpath 11, and head NW for 90m until you reach a footpath junction where you turn right. Follow this path, Little Berkhamsted footpath 10, N for 380m until you reach a junction where you turn left on Little Berkhamsted footpath 9 and head W to Little Berkhamsted village (location - https://w3w.co/plates.solar.search).

9: Turn right in Little Berkhamsted then right again through the churchyard. When you reach the lane take the bridleway immediately opposite, Little Berkhamsted bridleway 19, and head N for 310m looking out for a gate on your left. Go through the gate, still on Little Berkhamsted bridleway 19, and head NW to a junction. Continue NW, now on Little Berkhamsted bridleway 18, until you reach the top of a lane (location - https://w3w.co/tile.only.flash). Continue heading NW along the footpath opposite, Little Berkhamsted footpath 4, for another 630m until you reach a lane (location - https://w3w.co/define.cups.origin).

Leg 4: Howe Green to the River Lea
2.5 miles (4 km)


10: Turn left on the lane and head W then SW for 110m until you reach a footpath on your right. Take this footpath, Little Berkhamsted footpath 1, and drop downhill to Bedwell Avenue. Turn left on Bedwell Avenue, which is also Little Berkhamsted bridleway 26, and head SW for 100m looking out for a footpath on the right. Take this path, Essendon footpath 2, and head W across the golf course for 390m until you reach the junction with Essendon footpath 5. Here you bear left and head SW for 380m until you reach Essendon Hill (location - https://w3w.co/cable.limit.broken).

11: Turn right on Essendon Hill and head N until you reach the bend at the bottom. At this point cross the road to take the bridleway on your left (location - https://w3w.co/rising.stir.cool). Follow this path, Essendon bridleway 6, and head W for 2 km until you reach a lane (location - https://w3w.co/clocks.join.ties).

Leg 5: River Lea to Essendon
2.7 miles (4.5 km)


12: Turn left on the lane, also Hatfield footpath 96 at this point, and head S for 890m until the lane becomes a footpath. Follow this footpath, now Essendon footpath 11 and head S and SE and uphill for 980m until you reach a lane. Turn left on the lane and head E for 380m to West End Lane. You will see the Candlestick pub on your right (location - https://w3w.co/pets.ranked.heat).

13: Turn left on West End Lane and head NE for 30m looking out for Essendon bridleway 10 on the left. Take this bridleway and head N and downhill for 930m until you reach a footpath on the right (location - https://w3w.co/upper.penny.gear).

14: Take this footpath, Essendon footpath 8, and head SE for 710m until you reach West End Lane. Turn left on West End Lane and follow it E for 650m uphill to the outskirts of Essendon (location - https://w3w.co/fever.brand.alien).

Leg 6: Essendon to Wildhill
2.6 miles (4.3km)


15: When you reach Essendon, take the footpath on your right just before the first house, Essendon footpath 17, and follow it SW, SE then SW passing the church on your left and the cricket club on your left and down to a woodland track. Turn right and follow this track, Essendon footpath 13, WSW then W for 670m crossing a footbridge and climbing up to a byway (location - https://w3w.co/yards.listed.faces). Turn left on the byway, Essendon BOAT 14 (byway open to all traffic), and follow it S for 520m until you reach a footpath on the left (location - https://w3w.co/salt.food.flips).

16: Take this path, Essendon footpath 16, and head SE for 740m crossing a footbridge and continuing until you reach a footpath junction. Here you turn right and head SW and then SE on Essendon footpath 15, until you reach the B158 (location - https://w3w.co/shut.bubble.loyal). Cross the road and head SE for 160m until you reach a footpath on your right (location - https://w3w.co/trucks.limbs.tube).

17: Take this path, Essendon footpath 20, and head SW for 190m. You will pass a house on the left and, soon after a swimming pool on your left you will go through a gate. Be sure to turn slightly to your right after that gate and then continue walking SW with the hedgerow on your left and field on your right until you reach a second gate. This path can be overgrown with nettles at times so pick up a stick to bend them back. At the second gate turn right and head NW now on Essendon footpath 19, until you reach the junction with Wildhill (location - https://w3w.co/race.oppose.press). Turn left and head SSW for 310m looking out for a footpath sign on your right (location - https://w3w.co/bared.wallet.opera).

18: Take this path, Hatfield footpath 85, and head NW across three fields emerging in the car park at The Woodman (location - https://w3w.co/star.yard.oppose).

Leg 7: Wildhill to Bell Bar
2.4 miles (3.8km)


19: Leave the car park at The Woodman and head W on Wildhill for 130m until you reach West End Lane on the right. Head N up West End Lane until you come to a bend where you turn left on a byway (location - https://w3w.co/record.decent.rots). This is Hatfield BOAT 80. Head W on this byway for 850m until you reach another byway on the left (location - https://w3w.co/vest.voters.fumes). Turn left here on Hatfield UCR 1 (unmetalled unclassed county road), and follow it S to Wildhill Road (location - https://w3w.co/smiles.moment.bucks).

20: Cross Wildhill Road and head S on Hatfield footpath 81 for 240m until the path bends left and becomes Hatfield footpath 82 (location - https://w3w.co/gets.still.share). Follow this footpath SE and SSE to Grubbs Lane. Turn left on Grubbs Lane and walk SE and against the traffic for 290m looking out for a footpath on the right (location - https://w3w.co/human.agents.forget).

21: Take this path, Hatfield footpath 83 and head SE across two fields until you reach a copse. On your right you will see the remains of a WWII Tet Turret. At this point your footpath becomes North Mymms footpath 66 and continues across a field emerging on Woodside Lane where you turn left to reach the A1000, the Great North Road (location - https://w3w.co/shin.draw.origin).

Leg 8: Bell Bar to North Mymms Park
3.6 miles (5.9 km)


22: Cross the Great North Road and head S on Bell Lane until you reach Bulls Lane on your right (location - https://w3w.co/organs.causes.leads). Head W on Bulls Lane until you reach Foxes Lane on your right (location - https://w3w.co/fund.before.rush).

23: Turn right on Foxes Lane, which is also North Mymms BOAT 84, and head W, NW, and W for 1.2km until you reach Dixons Hill Road in Welham Green (location - https://w3w.co/decay.goad.voice).

24: Turn left on Dixons Hill Road, cross the railway bridge then turn right on Travellers Lane (location - https://w3w.co/races.meals.tones). Head N on Travellers Lane for 330m until you reach Travellers Close on your left (location - https://w3w.co/power.chair.shared). Take this road and head W until you reach Pooleys Lane. Turn right and follow Pooleys Lane round to the left looking out for a footpath on your right (location - https://w3w.co/fell.waters.frogs).

25: Take this path, North Mymms footpath 20, and head NNW for 390m looking out for a footpath on the left (location - https://w3w.co/courier.budget.purple). Take this path, North Mymms footpath 23, and head SW for 510m until you reach a junction in the tracks. Continue heading SW, now on North Mymms restricted byway 22, for 260m until you reach the old Dellsome Lane, now a footpath. Turn right on Dellsome Lane and follow the path, which becomes North Mymms footpath 52 and head W for 320m until you reach a footpath on the left (location - https://w3w.co/invite.poppy.linked).

26: Take this path, still North Mymms footpath 52, and head S following the path as it crosses the A1(M). Immediately after the motorway turn left and keep following North Mymms footpath 52 SSE down the W side of the A1 (M) before it cuts diagonally across the field to a gate at the edge of woodland. Go through the gate, through the woodland, and emerge on Tollgate Road (location - https://w3w.co/budget.ages.storm). Cross Tollgate Road and walk past the lodge of North Mymms Park on the right and the war memorial on the left heading SE before turning right on St Mary's Church Road (location - https://w3w.co/horns.voters.assure).

Leg 9: North Mymms Park to Blackhorse Lane
1.7 miles (2.7 km)


27: Head SSE along St Mary's Church Road, also North Mymms bridleway 2 for 700m until the road bends to the right (location - https://w3w.co/cook.erase.onions). Here you continue heading SSE, still on North Mymms bridleway 2, as it climbs over Cangsley Grove.

28: Continue heading S on this track as it drops down through the Potswell Valley, climbs over Hawkshead Wood and continues downhill to Blackhorse Lane, South Mimms. Just before you reach Blackhorse Lane you will come to a cottage on your left. Look out for a bridleway immediately after the cottage (location - https://w3w.co/finger.clay.quest).

Leg 10: Blackhorse Lane to Brookmans Park
2.5 miles (4 km)


29: Take this track, Ridge restricted byway 11, and head uphill. As you pass the farm on the right this track becomes North Mymms restricted byway 3 and heads NW and uphill then downhill for 1.7km until you reach the A1(M). Cross the motorway. On the other side you reach Swanland Road. Cross the road and head W on the cut through to Warrengate Road (location - https://w3w.co/supper.spots.brief).

30: Turn left on Warrengate Road and head NNW for 520m passing the water treatment works on the right and looking out for a footpath on the right soon after (location - https://w3w.co/booth.stews.organ). Take this path, North Mymms footpath 11, cross Mimmshall Brook on a concrete footbridge (stop to see if you can spot a kingfisher) and follow the path E for 530m until you reach a gate and a footbridge. Cross the footbridge, turn left and continue heading E, with the hedge on your left and field on your right, until you reach another gate where you turn left on North Mymms footpath 9, cross another bridge, and head NNE for 610m to Station Road (location - https://w3w.co/pardon.trash.train). Turn right and follow Station Road S until you reach Brookmans Park village.

Interactive map


Walk 72: Essendon to North Mymms Linear

7.8 miles (12.5 km) with 158m of total ascent


The bridleway between points 4 and 5
This walk starts in the village of Essendon, drops down to the Lea Valley, follows the Lea Valley Walk W for about a mile before heading S through the rolling countryside between Essendon, West End, Wildhill, and Bell Bar.

Directions


Map for Walk 72: Essendon to North Mymms Linear
Created on Map Hub by Hertfordshire Walker
Elements © Thunderforest © OpenStreetMap contributors

There is an interactive map below these directions
Those with GPS devices can download GPX or KML files for this walk. We've added What3Words location references for those who use that system. If you print these walks you might want to use the green PrintFriendly icon at the bottom of these directions to delete elements such as photographs.

This walk has two possible end points, one in Brookmans Park, the other in Welham Green. The walk makes use of the Centrebus shoppers service 201 to reach the start point. The service operates between North Mymms and Welwyn Garden City via Wildhill and Essendon on Tuesdays and Fridays (with the exception of public holidays). The current timetable is embedded below these walk directions.

At the time of writing, the bus leaves Welham Green station at 09:23 and reaches Bradmore Green in Brookmans Park at 09:28. Please check departure times at the Centrebus site because they might have changed. Ask the driver to give you a shout when you reach Essendon village centre. Alight just past the cricket ground and close to the church.

Photograph of The Lea Valley Walk footpath mentioned in point 3 below Image by Hertfordshire Walker released under Creative Commons BY-NC-SA 4.0
The Lea Valley Walk bridleway mentioned in point 3 below
1: Walk NW along Essendon High Road, past the church, and turn left on West End Lane heading W until you reach the last house on your right. Take the footpath on your right immediately after the house (location - https://w3w.co/funded.memo.awards). This is Essendon footpath 5, and follow it NE across a field for 350m to Essendon Hill.

2: Cross Essendon Hill and turn left following the footpath alongside the right-hand side of the road as it drops down hill and heads N for 650m.

The bridleway off Essendon Hill  Image by Hertfordshire Walker released under Creative Commons BY-NC-SA 4.0
The bridleway off Essendon Hill
3: At the right-hand bend at the bottom of the hill, cross the road and go down the bridleway on your left (location - https://w3w.co/trunk.estate.rats). This is the Lea Valley Walk, also Essendon bridleway 6. Follow it W for 1.4km until you reach a bridleway on your left (location - https://w3w.co/holds.sugars.ranges).

The path heading south from Essendon bridleway 6  Image by Hertfordshire Walker released under Creative Commons BY-NC-SA 4.0
The path heading S from Essendon bridleway 6
4: Take this bridleway, Essendon bridleway 10, as it climbs up from the Lea Valley heading S and SSE for 1.5km until it reaches West End Lane (location - https://w3w.co/grew.flag.milky).

5: Turn right on West End Lane and follow the road round until you reach The Candlestick (location - https://w3w.co/breed.backup.bucket).

Take the footpath immediately before the pub, Essendon footpath 13, and follow it heading ESE for 430m along the side of the building, through a wooded area and into an open field. Continue along this path with the hedgerow on your left and the field on your right until you reach a byway (location - https://w3w.co/retail.vets.wire).

Photograph of The footpath heading east and downhill from the Candlestick at West End Image by Hertfordshire Walker released under Creative Commons BY-NC-SA 4.0
The footpath heading SE from the Candlestick
6: Turn right on the byway, Essendon BOAT 14 (byway open to all traffic) and follow it first S then SW for 1.1km until you reach West End Lane (location - https://w3w.co/fake.loaded.moss).

7: Turn left on West End lane and follow it S, WSW and then SSE for 750m down to Wildhill where you turn left and walk E for 120m to The Woodman (location - https://w3w.co/join.allows.broker).

8: Take the footpath just beyond The Woodman car park, Hatfield footpath 84, via the gate at the S end (location - https://w3w.co/chips.shave.translated).

Head SSW for 240m, cross the field, go over a footbridge, through another gate, across another field, another footbridge and turn left emerge into a large field via a third gate (location - https://w3w.co/snap.fuzzy.gave).

Turn right and head SW and then SSW for 200m keeping the field on your left and the hedgerow on your right until you reach a gap in the hedge (location - https://w3w.co/slam.watch.zones).

9: Go through the gap and head diagonally to your right heading first W then SW for 220m keeping the field to your left and the hedge to your right as you climb the hill.

The path now turns SSW for 130m cutting diagonally through the crop to reach the top of the hill (location - https://w3w.co/begins.papers.torch).

At the top of the hill follow the path SSW for 270m with the woodland on your right until the path reaches Grubbs Lane (location - https://w3w.co/song.remind.small).

10: Turn left and and head SE for 75m looking out for a footpath on the right (location - https://w3w.co/stroke.fight.jabs).

Take this footpath, Hatfield footpath 83, as it heads SW for 750m as it cuts through the crop, goes over a footbridge, cuts diagonally across the next field, to a small copse where it becomes North Mymms footpath 66).

As you go through the woodland look out for the remains of a WWII Tet turret on your right (location - https://w3w.co/prompting.fact.casual).

Continue across a third field and emerges on Woodside Lane by the garage on the A1000 (location - https://w3w.co/stored.crisis.barks).

11: Cross The Great North Road with care and take the lane opposite, Bell Lane.
* If you want, you can stop for refreshments at The Cock Of The North to your left or The Dutch Marketplace, also on your left.

Continue down Bell Lane SSW for 460m until the lane bends to the left (location - https://w3w.co/fight.tested.level).

12: Take the footpath on the right, North Mymms footpath 33, and head NW and then W with the woods on the left and the fields on the right for 1.1km until you reach Bulls Lane (location - https://w3w.co/chins.lush.dairy).

Turn left along the footpath running along the S side of Bulls Lane and head W for 420m until you pass under the railway bridge.

13: At this point you have the options of going to Brookmans Park station or Welham Green station.

Interactive map


201 service timetable (as of July 2020)


Walk 67: Kentish Lane Loop

10 miles (16 km) with 252m total ascent


Bridleway 10 often a blaze of wild rose in June

A circular walk enjoying the secluded paths and woodlands of the undulating countryside between Essendon, Howe Green, Little Berkhamsted, Epping Green, and Wildhill. The walk passes four pub. It can be muddy in places after rain.

Directions


Note: This walk crosses over a golf course


Walk 67: Kentish Lane Loop Created on Map Hub by Hertfordshire Walker Elements © Thunderforest © OpenStreetMap contributors There is an interactive map at the end of these directions
Walk 67: Kentish Lane Loop
Created on Map Hub by Hertfordshire Walker
Elements © Thunderforest © OpenStreetMap contributors

There is an interactive map at the end of these directions
Those with GPS devices can download GPX or KML files for this walk. We've added What3Words location references for those who use that system. If you print these walks you might want to use the green PrintFriendly icon at the bottom of these directions to delete elements such as photographs.

Directions


1:From The Woodman in Wildhill (location - https://w3w.co/shots.sculpture.turkey) turn left on Wildhill Road and head W for 110m until you meet West End Lane where you turn right and head NNW for 740m following the lane as it dips and then climbs to a right-hand bend. Continue round to your right and head ENE following the lane as it then turns left and then heads N. Look out for a byway sign on your right (location - https://w3w.co/fake.loaded.moss). This is a Essendon BOAT 14, (byway open to all traffic).

2: Take this path and continue through Home Wood and Harefield Wood for 1.1km. At first you will be heading E and then NE. After half a mile you will see footpath 16 going off to your right. Ignore it and continue along the BOAT as it heads N, dipping and climbing up to a footpath on your left just opposite a white-topped footpath marker post. This is Essendon footpath 13 (location - https://w3w.co/retail.vets.wire).

3: Turn left here and follow the footpath WNW for 420m along the edge of the field until you reach The Candlestick on West End Lane (location - https://w3w.co/sleeps.quarrel.racing).

4: At The Candlestick turn right on West End Lane for 90m as it heads N and then NE. Just before the houses on your left you will see a bridleway on your left (location - https://w3w.co/mint.slang.foster). This is Essendon bridleway 10. Take this path and head NNW and then N. A great time to do this walk is in late May and June when the hedgerow along this route is rich in wild rose. Continue down this path for 890m until you reach a footpath on your right (location - https://w3w.co/teams.mutual.oddly). This is Essendon footpath 8.

Bridleway 10 as it dips down just before meeting footpath 8, referred to in point 4 above Image by Hertfordshire Walker released under Creative Commons BY-NC-SA 4.0
Bridleway 10 just before meeting footpath 8 (point 4)
5: Take this path and follow it for 710m as heads SE across fields, past Larkinshill Grove. At the end of Larkinshill Grove (location - https://w3w.co/claps.wink.task) head straight following the path cut through the crop SSE before emerging on West End Lane (location - https://w3w.co/splash.taped.zeal).

6: Here you turn left and follow West End Lane uphill heading E for 630m towards Essendon. When you reach the outskirts of the village, look out for a footpath on your left before the first house on the left. This is Essendon footpath 5 (location - https://w3w.co/flies.snow.player).

7: Take this path and head NE for 360m over the fields to the B158 Essendon Hill (location - https://w3w.co/young.rainy.just).

8: Cross the road and take the footpath immediately opposite (location - https://w3w.co/track.ending.fell). This is still Essendon footpath 5 which now heads ENE and E across Essendon golf course for 400m until you reach a footpath, Essendon footpath 2 (location - https://w3w.co/summer.modern.locals). Continue heading E for 390m crossing the golf course and emerging via a footbridge leading to Bedwell Avenue (location - https://w3w.co/demand.backed.sheep).

Footpath 2 across Essendon golf course, see point 8 above Image by Hertfordshire Walker released under Creative Commons BY-NC-SA 4.0
Footpath 2 across Essendon golf course, see point 8 above
9: Here you turn left for 100m walking NNE until you reach a footpath on your right (location - https://w3w.co/book.harp.school). This is footpath Little Berkhamsted footpath 1. Take this path as it continues E heading uphill for 160m to a lane (location - https://w3w.co/estate.dozen.vision). Turn left and follow the lane for 190m as it turns to the right. Look out for a footpath on your right soon after a house on your right at the point where the road bends to the left (location - https://w3w.co/empty.stored.carbon). This is Little Berkhamsted footpath 4.

The route to footpath 4 signposted to Ashfield Farm Image by Hertfordshire Walker released under Creative Commons BY-NC-SA 4.0
The route to footpath 4 signposted to Ashfield Farm (point 9)
10: Take this path as it heads SSE for 1.1km. At first you see a large house on your right and fields on your left before you cross open fields. You emerge at the end of a lane (location - https://w3w.co/awards.parade.rigid). Here you continue heading straight SSE down Little Berkhamsted bridleway 18 with Ashfield Farm on your right. Continue until you reach a footbridge (location - https://w3w.co/rust.broad.bridge).

The bridge on bridleway 19 shortly before the climb up to Breach Lane Image by Hertfordshire Walker released under Creative Commons BY-NC-SA 4.0
The bridge on bridleway 19 shortly before the climb up to Breach Lane
11: Immediately after the footbridge take the left-hand fork and climb the hill heading SSE for 330m now on Little Berkhamstead bridleway 19 until you reach Breach Lane (location - https://w3w.co/retain.idea.congratulations). Turn right on Breach Lane and walk S for 290m until you reach Little Berkhamstead (location - https://w3w.co/later.loss.fast). As you reach the road, immediately opposite is the entrance to the churchyard. Take this track and, keeping the church on your right, follow the path until it reaches Church Road (location - https://w3w.co/tonic.drip.toast).

12: Immediately after leaving the churchyard on Church Road, take the footpath on your left. This is Little Berkhamsted footpath 9. Continue along this path heading ENE for 310m with fields on your right and the hedgerow on your left and follow it as it swings to the right (location - https://w3w.co/modern.boom.tidy) and heads SSE just before woodland. You are now on Little Berkhamsted footpath 10.

13: Continue along the path heading SSE for 320m as it dips and then climbs. At the point where the path swings to the right you take the left fork, cross a brook (location - https://w3w.co/from.star.shop) and climb up to woodland. Continue until you come to the end of a small thicket on your left and where a path on your left (location - https://w3w.co/went.roses.books) heads downhill into Buck's Alley Woods. This is Little Berkhamsted footpath 11.

14: Enter the woods, turn right and follow Little Berkhamsted bridleway 23 as it heads SE, S, SE, and then SW, dipping and then climbing for 690m. After a footbridge continue S until the path bends to the left at the point where another footpath heads to your right (location - https://w3w.co/solar.fields.fault). This is Little Berkhamsted footpath 14.

15: Take this footpath and head SW for 450m crossing a a couple of fields before emerging on Epping Green (location - https://w3w.co/habit.fakes.oldest). At this point you could turn right for refreshments at The Beehive pub/restaurant.

16: Turn left on Epping Green and after 30m take the bridleway on your right. This is Little Berkhamsted bridleway 22. Take this bridleway for 250m SW along a tree-lined avenue. At the fork by a large brick wall, take the left-hand option and continue for 570m, first along the lane (it looks private but it's not) until it becomes Hatfield footpath 91 (location - https://w3w.co/monkey.sugar.tower). Take this path and head S across fields to Tylers Causeway (location - https://w3w.co/space.swing.again).

The junction of bridleway 22 and footpath 9 Image by Hertfordshire Walker released under Creative Commons BY-NC-SA 4.0
The junction of bridleway 22 and footpath 9
17: Turn left on Tylers Causeway (take care here because there is no footpath alongside the road) and head E for 170m looking out for a footpath on your right (location - https://w3w.co/pardon.settle.guilty). This is Hatfield footpath 90. Take this path and head S for 980m with the fields on your right and the hedgerow on your left. You will pass a small pond on your right before climbing up to a track at the top of the hill (location - https://w3w.co/linked.famed.dining).

The small pond to the right of footpath 90 Image by Hertfordshire Walker released under Creative Commons BY-NC-SA 4.0
Bullrushes on the small pond to the right of footpath 90
18: Turn right on Hatfield restricted byway 88 and head NW for 950m, passing a field of horses on your right and New Park Farm on your left before the track opens up with fields on both sides and great views.

19: After the byway turns to the right and heads N you will see a path going off to your left. Ignore this and continue N for until you reach Tylers Causeway (location - https://w3w.co/sounds.silent.trap).

20: Here you turn left for 90m and, immediately after Birchwood Cottages on your right take Cucumber Lane (location - https://w3w.co/thinks.tennis.like) and head NW for 440m.

21: When you reach woodland and Cucumber Lane veers right, take the footpath on your left (location - https://w3w.co/cried.logic.leave). This is Hornbeam Lane, Essendon bridleway 18, and is a magnificent avenue of trees through Nine Acre Wood. Continue along this bridleway for 1.2km. You will pass a large house on the left and stables on the right. Continue along this lane until you reach the last house on your left where you will see a footpath on your left (location - https://w3w.co/trucks.limbs.tube).

Footpath 18, Hornbeam Lane leading from Cucumber Lane to footpath 20 Image by Hertfordshire Walker released under Creative Commons BY-NC-SA 4.0
Footpath 18, Hornbeam Lane leading from Cucumber Lane to footpath 20


The path beyond the gate mentioned below in point 22 goes to the right of the bush  Image by Hertfordshire Walker released under Creative Commons BY-NC-SA 4.0
The path mentioned in point 22 goes to the right of the bush
22: Take the path, Essendon footpath 20, along the side of a house. When you reach a gate make sure you follow the direction of the waymark sign and head to the right of the bush ahead, and not to the left, (see image above) and continue SW with the field on your right and the hedgerow on your left for 190m until you reach another gate leading in the SW corner of the field leading to footbridge.

This part can be overgrown with nettles in the summer, so pick up a stick to brush them aside. Here you turn right on Essendon footpath 19 and head NW for 210m until you reach the B158 at the top of Wildhill Lane (location - https://w3w.co/blocks.recent.ample). Turn left here and continue down the left-hand side of the B158 and head SSW for 300m looking out for a footpath sign on your right (location - https://w3w.co/smiled.pets.cube).

The penultimate gate on footpath 85 leading to a field dropping down to The Woodman, Wildhill Image by Hertfordshire Walker released under Creative Commons BY-NC-SA 4.0
The penultimate gate on footpath 85 leading to The Woodman
23: Take this path, Hatfield footpath 540 and head NW with woodland on your right until you reach a gate. Go through the gate, cross two fields, and drop down to the car park at The Woodman, Wildhill.

Interactive map


Walk 53: Essendon East Loop

6.5 miles (10.5 km) with 194m total ascent


Photograph of the footbridge on Walk 53: Essendon East Loop
 
This walk from Essendon heads E to Howe Green then on to Bayford, S to Little Berkhamsted, and back to Essendon. This route crosses Essendon golf course twice and includes a fair amount of up and down. There are two pubs along the way.

Directions


Note: This walk crosses over a golf course


Walk 53: Essendon East Loop
Click on the map above for a larger version
Created on Map Hub by Hertfordshire Walker
Elements © Thunderforest © OpenStreetMap contributors

There is an interactive map at the foot of this page
Those with GPS devices can download GPX or KML files for this walk. We've added What3Words location references for those who use that system. If you print these walks you might want to use the green PrintFriendly icon at the bottom of these directions to delete elements such as photographs.

1: From the village of Essendon walk W on West End Lane for 120m until you reach a footpath on the right just after the last house on the right (location - https://w3w.co/carry.hobby.tune). This is Essendon footpath 5.

2: Take this path and walk diagonally NE for 350m across the field until you reach the B158, Essendon Hill (location - https://w3w.co/live.lamp.raft).

3: Cross the road and take the footpath opposite, still Essendon footpath 5, as it heads NE over the golf course for 380 to a footpath junction. Here you head E, now on Essendon footpath 2, for 400m until you reach a footbridge leading to Bedwell Avenue (location - https://w3w.co/demand.backed.sheep).

4: Turn left and walk NE for 90m on Little Berkhamsted bridleway 26 looking out for a footpath sign on your right (location - https://w3w.co/launch.face.pound). Take this path, Little Berkhamsted footpath 1 which heads ENE and for 150m, climbs a hill and crosses a field before reaching a lane (location - https://w3w.co/estate.dozen.vision). This is Little Berkhamsted bridleway 18.

5: Turn left then follow the lane (Little Berkhamsted bridleway 18) NE and then E for 180m until the lane bends to your left.

6: At this point you will see a footpath sign on your right just after a house (location - https://w3w.co/yoga.tiny.lunch). Take this path, Little Berkhamsted footpath 4 and head SSE for 650m across a couple of fields until you emerge at the top of a lane by Ashfield Farm (location - https://w3w.co/slice.locked.tunnel).

7: Continue straight ahead heading SSE along Little Berkhamsted bridleway 18 for 40m looking out for a footpath on your left (location - https://w3w.co/save.pigs.gifted). Take this footpath, Little Berkhamsted footpath 3, and follow it for E for 300m as it climbs over a hill and drops down to a gate leading to a track and then a paved lane. Follow this lane for 540m as it heads SE round to the right with Culver Wood on your left and then E to a road called Robins Nest Hill (location - https://w3w.co/wiping.purely.erase).

8: Turn left and walk N for 110m along the E side of the road looking out for a footpath on your right (location - https://w3w.co/meal.fame.wisely). This is Little Berkhamsted footpath 5 which heads E with the fields on your left. Continue along this path for 260m to a lane (location - https://w3w.co/movie.riches.hoot).

9: Turn right then follow the lane, which is also Little Berkhamsted bridleway 20. Head S and SE for 300m until you meet a bridleway on your left (location - https://w3w.co/grants.soaks.famous).

Take this track, Little Berkhamsted bridleway 21, and follow it NNE and then NE for 270m until it meets another lane near some houses (location - https://w3w.co/doctor.grows.smashes).

10: Here you turn right and continue S for 110m on a gravel track which is Little Berkhamsted footpath 24 looking out for a footpath on the left (location - https://w3w.co/small.year.tiles). This is Little Berkhamsted footpath 6 which heads ENE then NE down to Bayford Wood.

11: Enter Bayford Wood (location - https://w3w.co/crunch.wacky.pizza) where your footpath becomes Bayford footpath 3. Follow it for 270m as it crosses a footbridge, climbs through the woods heading NE, and then crosses a field heading ENE to a footpath junction (location - https://w3w.co/ideal.amuse.arts).

12: Here you turn right and head SE on Bayford footpath 4 for 330m as the path bends to the E emerging on Bayford Lane (location - https://w3w.co/river.hangs.wide).

13: Turn right on Bayford Lane and head S, E and then S for 650m to Bayford village. Unfortunately this part of the walk involves some lane walking. Some stretches don’t have footpaths.

14: Head SW for 770m along Ashendene Road until you reach a footpath on your right (location - https://w3w.co/natively.lamp.keep).

15: Take this path, Bayford footpath 5 for 640m, first NW, then SW and NW again through the fields and then into Bayford Woods. Continue until you reach a footbridge (location - https://w3w.co/full.plan.steep).

16: Cross the footbridge and turn left, now on Little Berkhamsted footpath 9 and head SW and W for 580m through the fields climbing your way up to Little Berkhamsted, emerging on a lane called Bucks Alley (location - https://w3w.co/called.cheese.reap).

17: Turn right on Bucks Alley and head NW for 15m looking out for a footpath on your left (location - https://w3w.co/cross.union.making). This is a continuation of Little Berkhamsted footpath 9 which heads WSW for 340m over the fields to Little Berkhamsted village. Turn left in the village and head S for 50m until you reach The Five Horseshoes. Look out for a footpath on your right running along the side of the village cricket ground (location - https://w3w.co/lofts.belong.pounds).

18: Take this path, Little Berkhamsted footpath 8, and head WSW for 180m with the cricket pitch on your left until you reach a gate. Here you turn right on Little Berkhamsted bridleway 22 and head NW for 60m until you reach Little Berkhamsted Lane (location - https://w3w.co/energetic.launch.stars).

19: Turn left on Little Berkhamsted Lane and head SW for 100m looking out for a bridleway/lane on your right (location - https://w3w.co/living.cherry.offer). This is Little Berkhamsted bridleway 17 which heads NW for 970m dropping down through woodland until it reaches a cottage on the left by the golf course (location - https://w3w.co/tens.shots.supply).

20: At the cottage head W on Essendon bridleway 4 climbing W for 190m up to the golf club buildings (location - https://w3w.co/rich.supporter.habit).

21: Follow the path round as it bends right then left and then continues W and NW for another 510m across the fairway eventually emerging on School Lane (location - https://w3w.co/asset.paper.lucky).

22: Turn left on School Lane and head W for 180m back to Essendon village.


Interactive map


Walk 50: Bayford - North Mymms Linear

8.6 miles (13.8 km) with 224m total ascent


Photograph of the footbridge through Bayford Wood on Walk 50: Bayford Linear
Bayford Wood
A linear walk from Bayford station going through Bayford, across fields and through woodland to Howe Green, over the golf course to Essendon, via West End, down to Wildhill via a secluded byway, and west over the fields via Bell Bar to Brookmans Park or Welham Green.

Directions


Note: This walk crosses over a golf course


Map for Walk 50: Bayford - North Mymms Linear
Click on the map above for a larger version
Created on Map Hub by Hertfordshire Walker
Elements © Thunderforest © OpenStreetMap contributors

There is an interactive map embedded below the directions
Those with GPS devices can download GPX or KML files for this walk. We've added What3Words location references for those who use that system. If you print these walks you might want to use the green PrintFriendly icon at the bottom of these directions to delete elements such as photographs.

1: Leave Bayford station (location - https://w3w.co/bossy.grab.remind) then head WNW and then NNW along Brickendon Lane for 600m. There isn’t a footpath along this road, but you can walk along the grass to the side of the road in places.

Continue until you reach a road junction with Ashdene Road going off to your left. Your way is almost straight on for 630m down the road that heads NW (with the village pond on the left). This road passes houses on the left and heads towards the church on the bend. At the left-hand bend continue with the road (taking care because there is no footpath) as it bends again, this time to the right by a cottage.

2: Immediately after the cottage you will see a footpath sign on your left (location - https://w3w.co/wins.bound.zooms). Take this path, Bayford footpath 4, for 330m heading W through some paddocks, up the slight hill to some trees.

Keep NW looking out for a path on your left (location - https://w3w.co/ideal.amuse.arts). Take this path, Bayford footpath 3, and head WSW for 260m first through the crops and then SW through Bayford Woods. Follow the path downhill to a footbridge.

3: Cross the footbridge and climb the hill to reach a field (location - https://w3w.co/pasta.joke.twin). When you get to the field turn left on Little Berkhamsted footpath 6, and head SW for 190m following the path through a gap in the hedge and head W up the hill with the hedgerow on your right and the field on your left until you reach a track (location - https://w3w.co/small.year.tiles). Turn right on this gravel track, Little Berkhamsted footpath 24, and head N for 120m towards a large house.

4: Just before you reach the house take the bridleway on your left, Little Berkhamsted bridleway 21 (location - https://w3w.co/price.sung.scam) and continue WSW and then SW along this path for 280m until you reach a track (location - https://w3w.co/carry.frost.many), which is also Little Berkhamsted bridleway 20, where you turn right and head NW for 140m.

You will pass a large house on your right and, soon after the track heads NNW for 150m, past some cottages on your right. Continue until you see a footpath on your left (location - https://w3w.co/gained.wins.brains). Take this path, Little Berkhamsted footpath 5, and head W for 260m until it emerges on Robins Nest Hill (location - https://w3w.co/fade.faster.keen).

5: Turn left on the footpath that runs alongside Robins Nest Hill and head S for 110m until you reach a cottage on your right. Immediately after the cottage you will see a footpath on your right (location - https://w3w.co/vest.honest.pounds).

Take this path, Little Berkhamsted footpath 3, and head SW for 190m with Culver Wood on your right, and then head NW for 270m passing farm buildings on the right and continue until you reach a field (location - https://w3w.co/libraries.elbow.judge). Cross a stile, climb the hill and head W for 300m over the field with the large tree on your right until you reach a stile at the other side (location - https://w3w.co/save.pigs.gifted).

6: Cross this stile, turn right and head NW for 35m on Little Berkhamsted bridleway 18 until it becomes a lane and bends to the left heading W for 200m passing cottages on your left. When you reach a cottage on your right, look out for a path on your left as the lane bends to the right (location - https://w3w.co/solved.events.spices).

At this point the path splits but converge again so it doesn't matter which you take. But if you keep to the left you can follow Little Berkhamsted bridleway 27 and head down the hill for 330m with the quarry on your right until you reach Essendon Golf Course (location - https://w3w.co/robe.shrimp.chips).

7: Head W across Essendon Golf Course on Essendon footpath 3 for 530m until you reach the primary school in Essendon village (location - https://w3w.co/flood.jokes.animal). Continue SW along School Lane for 280m past the community centre until you reach the B158, Kentish Lane (location - https://w3w.co/policy.give.finger).

8: Cross Kentish Lane and turn left heading W for 70m until you reach a footpath on your right heading across Essendon Cricket Club (location - https://w3w.co/owners.probe.remind).

Follow this path, Essendon footpath 13 WSW for 620m first through a gate at the back of the cricket club, through woodland, down a hill to a footbridge across a Essendon Brook. Cross the bridge and follow the path W up the hill for 240m until you reach a crossing in the tracks (location - https://w3w.co/sums.holds.ranch). This is Essendon BOAT 14 (byway open to all traffic).

* At this point there is the option of taking a detour to The Candlestick (location - https://w3w.co/posed.papers.wake) for refreshments. To do this turn left on the BOAT for 20m and then take the footpath on your right and head NW for 430m.

9: If you are not visiting The Candlestick, turn left and continue S down the BOAT for 516m before it swings SW at a footpath junction and continues for another 610m until it emerges on West End Lane (location - https://w3w.co/rats.trying.upgrading). Here you turn left and head S, then SW and SSE for 750m until you reach Wildhill. Turn right and head E for 120m to The Woodman.

10: Take the footpath just beyond The Woodman, Hatfield footpath 84, and walk through the pub’s car park leaving via the gate at the S end (location - https://w3w.co/varieties.belong.fairly).

Head SSW for 240m, cross the field, go over a footbridge, through another gate, across another field, another footbridge and turn left to a gate before reaching a field (location - https://w3w.co/flops.worked.crops).

Turn right and head SW and then SSW for 200m keeping the field on your left and the hedgerow on your right until you reach a gap in the hedge (location - https://w3w.co/slam.watch.zones).

Go through the gap and head diagonally to your right heading first W then SW for 220m keeping the field to your left and the hedge to your right as you climb the hill. Follow the path as it turns SSW and heads uphill for 130m cutting diagonally through the crop to the top of the hill (location - https://w3w.co/bottom.humble.space).

Follow the path SSW for 270m with the woodland on your right until you reach Grubbs Lane (location - https://w3w.co/tries.wipes.dose).

11: Turn left and and head SE for 75m looking out for a footpath on the right (location - https://w3w.co/senior.wished.blitz).

Take this footpath, Hatfield footpath 83, as it heads SW for 750m and cuts through the crop, goes over a footbridge, cuts diagonally across the next field, to a small copse where it becomes North Mymms footpath 66).

As you go through the woodland look out for the remains of a WWII Tet turret on your right (location - https://w3w.co/prompting.fact.casual). Continue across a third field and emerges on Woodside Lane by the garage on the A1000 (location - https://w3w.co/asks.flute.coherent).

12: Cross The Great North Road with care and take the lane opposite, Bell Lane.

* At this point you can stop for refreshments at The Cock Of The North (location - https://w3w.co/ridge.feed.hoping) to your left or The Dutch Nursery.

Continue down Bell Lane heading SSW for 460m until the lane bends to the left. Here you take the footpath on the right, North Mymms footpath 33, (location - https://w3w.co/fight.tested.level) and head NW and then W with the woods on the left and the fields on the right for 1.1km until you reach Bulls Lane (location - https://w3w.co/combining.rank.assume).

Turn left along the footpath running along the S side of Bulls Lane and head W for 420m to the railway bridge (location - https://w3w.co/indeed.corner.wished).

13: At this point you have the options of going to Brookmans Park station or Welham Green station.

* For Brookmans Park go under the railway bridge and take the footpath on your left, North Mymms footpath 34 (location - https://w3w.co/staple.pram.patch). Follow this path for 450m, first SSE, then SW through woodland, down some steps, over a brook and on to reach Station Road (location - https://w3w.co/eaten.walks.composers). Turn left on Station Road and follow it SE for 980m to Brookmans Park station (location - https://w3w.co/limbs.value.ozone). There are many options for refreshments in the village including the local pub, Brookmans.

* For Welham Green continue W for 300m along Bulls Lane to Holloways Lane (location - https://w3w.co/organs.single.sleeps). At this point you could continue heading W along Bulls Lane and turn right on Station Road to visit The Sibthorpe Arms (location - https://w3w.co/racks.varieties.lows), but if you don't need refreshments head NE on Holloways Lane for 450m, then turn right on Dixon Hill Road for 120m to Welham Green Station (location - https://w3w.co/amuse.equal.dash).

Interactive map


Walk 36: Lea Valley Long Loop

4.4 miles (7 km) with 101m total ascent


Essendon footpath 13 approaching the end of the walk
A pleasant circular that includes parts of a couple of shorter walks on this site, including Walk 5: The River Lea Loop, hence the name 'long' because it's longer than the original walk. The walk starts and ends at The Candlestick, West End, and includes a stretch of a bridleway along the Lea Valley before returning via the outskirts of Essendon.

Fly through preview of walk


If you want to check what sort of landscape you will be crossing before you set off on this walk you can view a short 3D video of the route below. It's created using the free version of Relive.


Directions


Map for Walk 36: Lea Valley Long Loop
Click on the map above for a larger version
Map created on Map Hub by Hertfordshire Walker
Elements © Thunderforest © OpenStreetMap contributors

There is an interactive map at the foot of this page
Those with GPS devices can download GPX or KML files for this walk. We've added What3Words location references for those who use that system. If you print these walks you might want to use the green PrintFriendly icon at the bottom of these directions to delete elements such as photographs.

The Candlestick at West End, Essendon
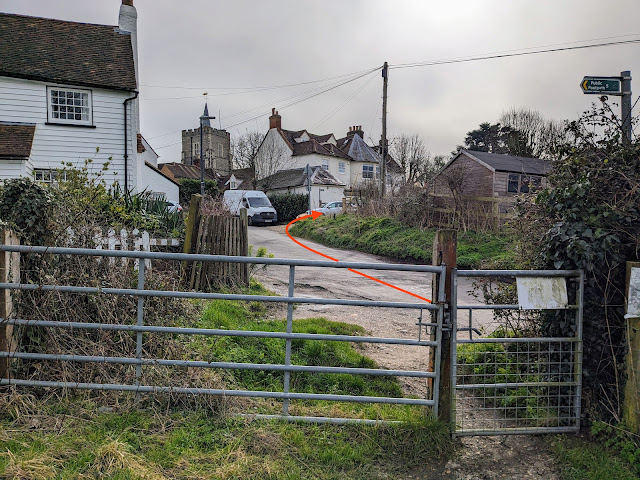
1: With your back to The Candlestick turn right then head N for 30m until you reach a lane on the left (location - https://w3w.co/pets.ranked.heat), see image below.

Turn left on this lane then head WSW for 370m
Turn left on this lane then head WSW for 370m, continuing until you reach the last cottage on the right and a footpath immediately after (location - https://w3w.co/little.flips.leaves), see image below.

Turn right on Essendon footpath 11
2: Turn right on Essendon footpath 11. There are signs along several sections of this walk asking dog owners to keep their pets under control, see image below.

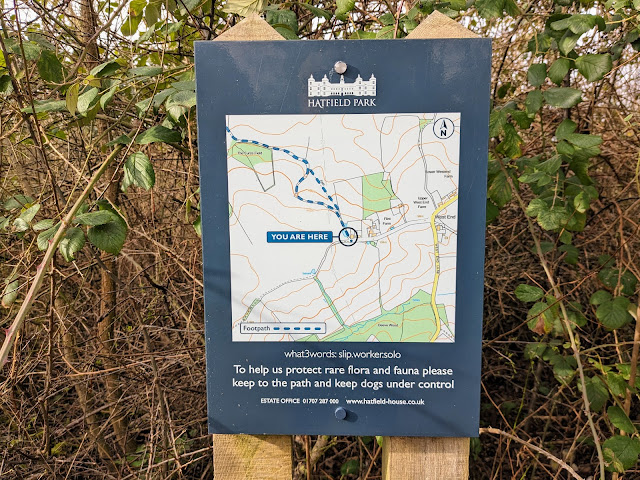
An area of rare flora and fauna
Follow Essendon footpath 11 as it weaves in a north-westerly direction for 990m until you reach a gate and a stile (location - https://w3w.co/trim.bath.fixed), see image below.

Continue heading N down a lane which is still Essendon footpath 11
3: Continue heading N down a lane, which is still Essendon footpath 11, for 450m until you reach Hill End Farm on the right (location - https://w3w.co/gain.gravel.luxury). At this point the lane you are on crosses a parish boundary and becomes Hatfield footpath 96. Continue heading N for 440m until the lane bends to the left (location - https://w3w.co/tame.sober.trail), see image below.

Turn right on Hatfield bridleway 75
4: Turn right on Hatfield bridleway 75 then head E for 100m at which point (location - https://w3w.co/pump.snap.insect) the path becomes Essendon bridleway 6. Continue on Essendon bridleway 6 for 840m until you reach a junction (location - https://w3w.co/curiosity.opera.beast), see image below.

Continue straight head E still on Essendon bridleway 6
5: Ignore the bridleway on the right then continue heading straight and E on Essendon bridleway 6 for 1.4km until the bridleway reaches a track (location - https://w3w.co/marble.with.motor), see image below.

Turn right then head ESE for 30m until you reach Essendon Hill
6: Turn right on the track then head ESE for 30m until you reach Essendon Hill, the B158 (location - https://w3w.co/rising.stir.cool). Cross the road then turn right and walk up the pedestrian pavement heading S alongside Essendon Hill for 660m until you reach a footpath on the right (location - https://w3w.co/live.lamp.raft), see image below.

Take Essendon footpath 5 on the right
7: Take Essendon footpath 5 on the right then follow it diagonally SW and uphill across a field, see images below.

Follow Essendon footpath 5 diagonally SW and uphill across a field

Head to the right of the last house
Continue for 350m heading to the right of the last house where you will emerge on West End Lane (location - https://w3w.co/look.tennis.cover), see image below.

Turn left on West End Lane then right on Essendon footpath 17
8: Turn left on West End Lane then walk SE for 30m until you reach Essendon footpath 17 on your right (location - https://w3w.co/filer.really.torn).

Turn right on Essendon footpath 17 then follow it for 45m until you reach a gate (location - https://w3w.co/worth.cliff.bells), see image below.

Go through the gate then head SW and downhill
Go through the gate then head SW and downhill for 120m to another gate (location - https://w3w.co/lift.pads.awards), see image below.

Go through the gate then continue on Essendon footpath 17
9: Go through the gate then continue on Essendon footpath 17 but now heading SE with the hedgerow on the left for 90m to another gate (location - https://w3w.co/tunes.cycle.cakes).

Head SW and downhill on Essendon footpath 17
10: Go through the gate then continue on Essendon footpath 17 but now heading SW and downhill for 120m until you reach woodland (location - https://w3w.co/flight.dogs.poem), see image below.

Go through the gate then turn right on Essendon footpath 13
11: When you reach the woodland turn right then follow Essendon footpath 13 SW for 400m through the woodland and downhill to a footbridge (location - https://w3w.co/price.fight.sizes), see image below.

Cross the bridge then climb the hill, still on Essendon footpath 13
Cross the footbridge then climb the hill, still on Essendon footpath 13
12: Cross the footbridge then climb the hill, still on Essendon footpath 13, for 240m until you reach a T-junction (location - https://w3w.co/sums.holds.ranch), see image below.

Turn left on Essendon BOAT 14
13: Turn left on Essendon BOAT 14 (byway open to all traffic) then head S for 20m before turning right on Essendon footpath 13 (location - https://w3w.co/storm.monday.season), see image below.

Follow Essendon footpath 13 NNW back to the starting point


Follow Essendon footpath 13 NNW for 430m back to the starting point.

Interactive Map


Facebook group rules

Facebook group rules
We have set 10 rules for our Hertfordshire Walker Facebook group which are designed to help keep the group focused on walking in the Hertfordshire countryside

Supported Charity: The Trussell Trust

Supported Charity: The Trussell Trust
Supporting those locked in poverty

Search This Site